Hi everybody!
In the past, I have talked about the different driver options that we offer. One of them is the IVI-COM/IVI-C driver. IVI actually stands for Interchangeable Virtual Instruments. Today I
am going to talk about how you can make that abbreviation true using the fact that our power supply can use the IviDCPwr class. I have received a few questions in the past
about how to do this and every time I do it, it takes me a while to remember all
of the steps. Posting it here will put it somewhere where people (including me!) can find it easily
To start off you need to download and install the following:
- The Agilent N6700 IVI-COM/IVI-C driver from Agilent’s website. If you get the driver from somewhere else, I am not sure how it will work.
- NI VISA since you will need NI-MAX
- IVI Compliance package
Once you have all of this, you are ready to get started.
The first thing that you need to do is set your targeted
instrument in NI-MAX. I have a N6702A
connected to my LAN. Here's how it shows up in MAX:
After that, you want to go to the "IVI-Drivers" menu, select the "Driver Sessions" item and right click on it to select "Create new". From there, click on the "software" tab and select the appropriate driver, in this case the AgN67xx driver.
You can see here that the driver complies to the IviDcpwr class whcih is what we will be using.
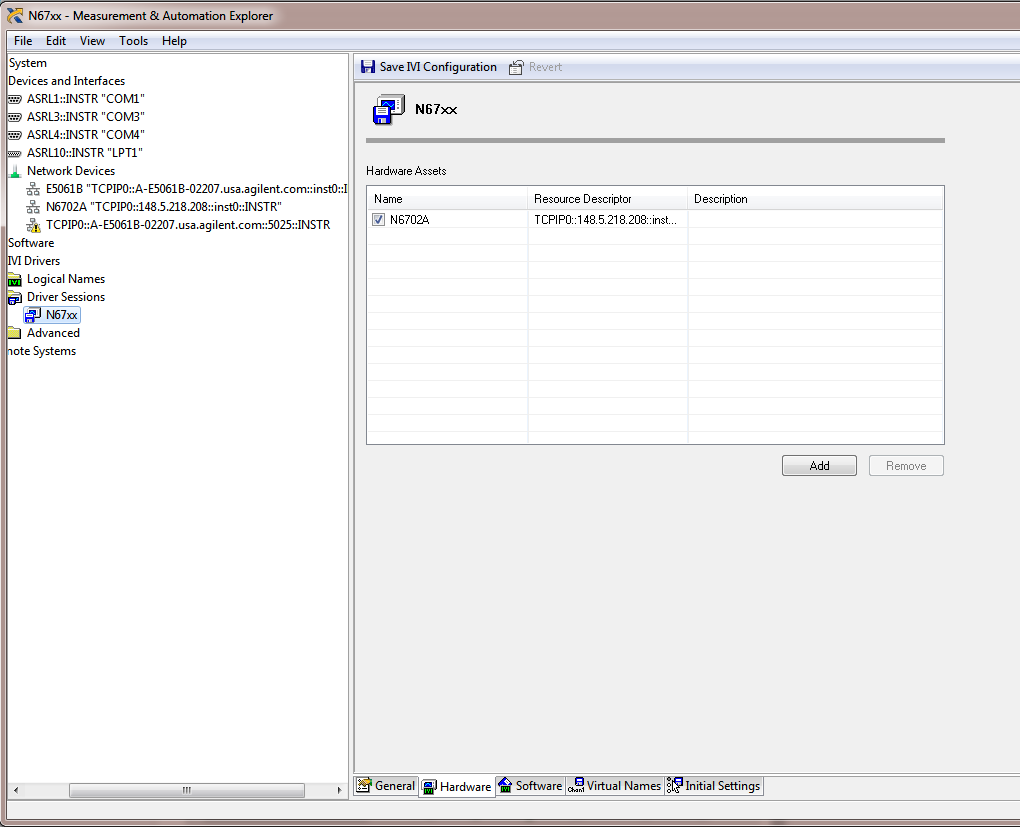
The next thing to do is in the "Hardware" Tab of the same menu. You need to specify which instruments use this driver. Click on "Add" to add your instrument. It should look like this:
One thing that I cannot stress enough is that you need to check that checkbox. In you don't, this will not work and you will spend a little bit of time trying to figure out why you are getting resource not found errors. Believe me I know this from experience! After you double check everything make sure that you click on "Save IVI Configuration".
Now choose "Logical Names". Right click on it and select "Create New". I created a logical name called "MPS" (this stands for Modular Power System if you were wondering). You need to refer it to the correct driver session:
Make sure to click on "Save IVI Configuration" again.
With that, you are ready to actually start! I used Visual C++ 2010 to write my example. Make sure that you have all of the IVI directories properly entered in your project. Also make sure that you reference the ividcpwr.lib file in your "linker" settings.
Here is my program listing:
#include <stdio.h>
#include "IviDCPwr.h"
void main()
{
ViStatus status;
ViSession session;
ViRsrc resource = "MPS";
ViConstString options = "QueryInstrStatus=true, Simulate=false, DriverSetup= Model=, Trace=false";
ViBoolean idQuery = VI_FALSE;
ViBoolean reset = VI_TRUE;
ViBoolean enabled = VI_TRUE;
ViChar ChannelName[16] = "";
ViInt32 index = 2;
ViInt32 bufferSize = 256;
ViConstString Cname;
ViReal64 Vmeasurement;
ViReal64 Ameasurement;
// This program initializes a session, programs a voltage and current on channel 2,
// enables the output, and measures voltage and current.
status = IviDCPwr_InitWithOptions(resource, idQuery, reset, options, &session);
status = IviDCPwr_GetChannelName (session,index, bufferSize,ChannelName);
Cname = ChannelName;
status = IviDCPwr_ConfigureOutputEnabled (session,Cname,enabled);
status = IviDCPwr_ConfigureVoltageLevel (session,Cname,4.0);
status = IviDCPwr_ConfigureCurrentLimit(session, Cname, IVIDCPWR_VAL_CURRENT_TRIP, 1);
status = IviDCPwr_Measure (session,Cname,IVIDCPWR_VAL_MEASURE_VOLTAGE,&Vmeasurement);
printf("Measured Voltage on channel is : %f V \n",Vmeasurement);
status = IviDCPwr_Measure (session,Cname,IVIDCPWR_VAL_MEASURE_CURRENT,&Ameasurement);
printf("Measured Current on channel is : %f A \n",Ameasurement);
status = IviDCPwr_close (session);
printf("\n Done - Press Enter to Exit");
getchar();
}
I am not going to go over the program in detail but here are the key things to note:
- You need to include "IviDCPwr.h". All the functions are in there. You do not need to reference the instrument specific driver.
- When you initialize the unit, you can refer to it by the name that you define in the "Logical Names" tab above. In my case, I use "MPS".
- This is a modular power supply. The variable "index" is controlling the channel.
- I have tested this program and it works properly.
In theory, you should be able to swap this power supply out with another class compliant power supply with minimal programming changes (though in this case if you switch to a single output supply you would need to take out the references to the multiple channels).
One last thing that I want to note is that this will be the last Watt's Up blog posted under the Agilent banner. Don't worry, we will still be posting the same great content but it will be under a Keysight Technologies banner. I have been working for Agilent for 14 years now so it will be odd at first to have a new name but I am looking forward to posting many more blogs as a Keysight employee. Goodbye Agilent Technologies it's been an interesting 14 years!


No comments:
Post a Comment
Note: Only a member of this blog may post a comment.